Showing posts with label OBD1READ. Show all posts

Tuesday, 10 September 2024

OBD1READ engines support list

This list contains Toyota ECUs known to have an obd1 data stream.

All north American versions support ends with the introduction of OBD2 ECUs mandatory for 1996.

(for instance a corolla 4a-fe would not be supported starting in 1996. )


Gasoline


E engines

        4E-FE in E100 corollas

        5E-FHE in GEN 2 Cynos 

            proven to work on 89661-16450 AT

        4E-FTE REV1 in starlet starting with 1992

            proven to work on 89661-10100 (EP82 M/T) 

         4E-FTE REV2 in EP9 starlet


A engines

        5A-FE in E100 corollas

           proven to work on 89661-1A430 

        4A-FE in E100 corollas

        7A-FE in E100 corollas

        4A-GE 20V silvertop  in E100 corollas 

        4A-GE 20V blacktop in E110 corollas 

            proven to work on 89661-1A860 


S engines 

        3S-GE REV2 in GEN MR2 and T18 Celica, starting with year 1992

            proven to work on 89661-17370

        3S-GE REV3 2 in GEN2 MR2 and T20 Celica

        5S-FE in GEN2 MR2, T18 Celica and T20 Celica starting in 1992

            proven to work on 89661-2B161 gen 5 celica

            proven to work on 89661-2B670 gen 6 celica

        3S-FE in GEN1 RAV4

        3S-GTE REV2  in ST185RC Celica starting in 1991 (only 3S-GTE supported in 1991)

        3S-GTE REV2 in GEN2 MR2 and T18 Celica, starting in 1992 (regular 3S-GTE)

            proven to work on 89661-2B280

         3S-GTE REV3 in GEN 2 MR2 and ST20 Celica

            proven to work on 89661-2B840


R engines

        22R-E in toyota pickup starting with 1994

            proven to work on 89661-3D060


RZ engines

        3RZ-FE  in Hilux


TZ engines

        2TZ-FE in previa/tarago/estima starting with year 1992


VZ engines

        2VZ-FE in GEN2 camry and ES250

            proven to work on 89661-32590 

        3VZ-E in Toyota pickup/4runner starting with 1992

         3VZ-FE in GEN3 camry starting with 1992

            proven to work on 89661-33120


M engines

        7M-GE in A/T cressida starting with 1987 (same years Supra not supported beware)


JZ engines 

        1JZ-GTE non VVTi in GEN 2 soarer and X90 Chaser and GEN3 Supra

            proven to work on 89661-22480 

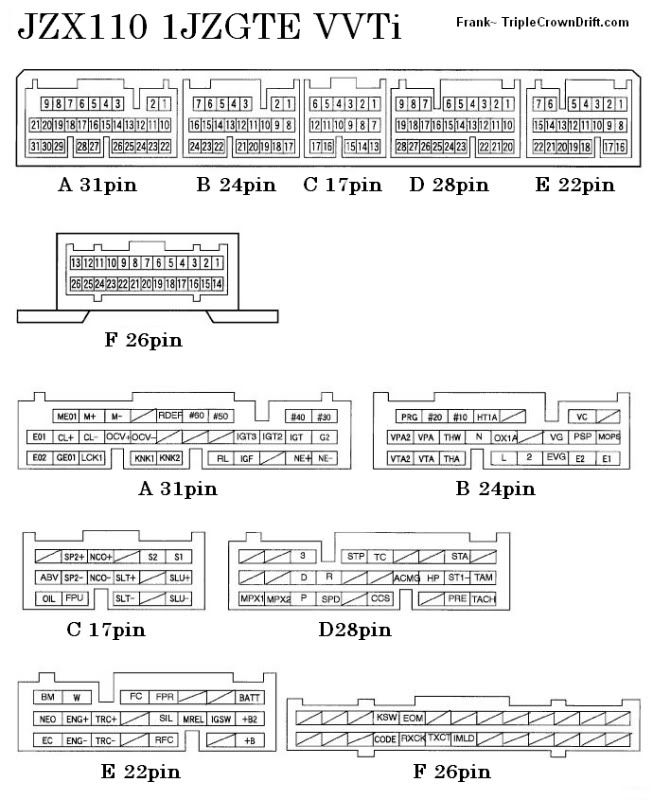
        1JZ-GTE VVTi in X100 Chaser

            proven to work on 89661-22790

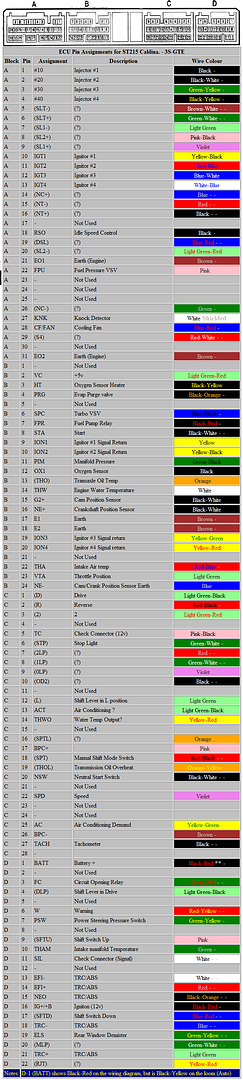
        2JZ-GTE non VVTi in GEN4 Supra, all years (please note that american supports end with OBD2 in 1996)

            proven to work on 89661-14490 

        2JZ-GE non VVTi in GEN4 Supra, all years (please note that american supports end with OBD2 in 1996)


FZ engines

        1FZ-FE in J80 Landcruiser starting with 1992

            proven to work on 89661-60310


UZ engines

        1UZ-FE non VVTi in GEN2 Soarer and Celsior/LS400

            proven to work on 89661-24240


Diesels


C engines

        2C-E in E100 corolla


KZ engines

        1KZ-TE in J90 Landcruiser

Tuesday, 26 December 2023

DIY 22P cable preparation

Usually found on e-bay named 22 Pin OBD1 to 16Pin OBD2 or something alike. 


Depending on vendors , internal wire count and color will vary so no definitive color code is to be shared. You need to find out which pin out your own cable uses.

Here are the tools of the trade today


First of all please draw the diagnosis box Pinout , found in toyobd1 glossary dialog on a paper sheet. this will be very useful when you will be testing continuity and when you will be soldering to the OBD1READ at a later time.


 Here are the steps needed before finding out the cable pin out

  • buy a cable
  • chop off the OBD2 end with heavy duty scissors. use tweezers to make a cleaner cut on the individual wires.
  • using the tweezers or specialized sleeve cuter remove external sleeve from the black cable ,about 1.5" of it
  • using the wire stripper, strip all individual wires 

Using a multimeter or anything capable to test wire continuity you will find out which are the wire of interest.


Write down the cable pin out as you find it on your paper sheet

After the elimination process is complete, simply chop off unused wires.


At that point the cable is ready for being soldered onto an OBD1READ board.

The soldering to an OBD1READ board will be documented at a later time.


Monday, 31 October 2016

Simplest Narrowband OX sensor simulator

BUILDING IT

 Hi, today I'll be sharing with you how to build a very simple narrowband oxygen sensor simulator, this thing is only useful to troubleshoot how an ECU reads the 2 states of an oxygen sensor. it does not simulate an oxygen sensor heater. On your left you will see the sensor curve for all NB oxygen sensors. the tool is simply a switch that outputs a ground path, or about 0.75 to 1V. allowing the user to simulate a rich or lean reading.


The Parts needed are very simple, and should be found at all local electronic parts shop.

4 X 1K resitors. 1/4w is fine
2 x 10k resistors. 1/4w is fine
3 x wires of different colors ,about 2 feet long gauge 20
1 x single pole double throw switch, something with 3 pins
2 x shrink wrap tubing for protecting the circuitry , or electrical tape

optional parts
shrink wrap to hide all of the 3 wires and the circuitry
3 x crocodile connectors
 Here you can see how I built it. very simple to do, twisting the resistors together and soldering it all in the end. adding the wires.
 complete tool ready for use

AND NOW PLAYING WITH IT

 I went ahead and proved the tool on my own like all mad scientist should be doing. Test subject is a 1997 toyota corolla, AE102 at birth , converted with an 92-93 3VZ-FE running a Canadian OBD1 A/T ECU with an OBD1READ device used in conjunction with TOYOBD1.


the tool sits on the front engine bank with the orange wire connected at the alternator pole, and the green wire connected to the chassis ground. white wire leads to the front bank ox sensor wire


First I warmed the engine up. then when ready ,toggling the switch with one hand an data logging in toyobd1 with the other I was able to fool my ECU into thinking the sensor reading was either rich or lean.

Summary

This tool can be used to make sure the wiring and  ECU are correctly working. leaving the only possible culprit to the sensor itself if something is wrong.

Sunday, 24 July 2016

TOYOBD1 :: Online Glossary

TOYOBD1 This is the current application, it allows you to see and record the information listed below with an interval of about 1.3s between frames. this delay is inheritent of the Toyota OBD1 protocol and sadly we cannot make it any faster.

OBD1READ The tool needed to connect to you car,(No an OBD2 elm327 wont work instead ). Visit www.zf-scantools.com to order yours.
Here is how to hook OBD1READ to your car, please note that VF can be labeled VF1. Check the diagram present in the diag blox cover for exact connections.
On some cars, TE2 and E1 must be tied together into the DLC2 connector.(namely JZA80 and Lexus SC400)

INJ Injector opening duration in Millisecond for one engine Revolution

IGN Ignition advance angle in degrees before TDC, positive values indicate angles after TDC

IAC Percentage of opening of Idle air control valve

RPM Engine speed,please note that the OBD1 protocol cannot show speed above 6375 rpm :S

VAF/MAP/MAF This is the value measured by the metering system in volts, kpa or gr/sec depending on configuration

ECT Engine coolant temperature reading

TPS Throttle position sensor,range should be 0-90 degrees

SPD Vehicle speed sensor

STFT S.hort T.erm F.uel T.rim, it represents how much the ECU needs to compensate VS what he expected

MPG Fuel consumption calculation


Means that the A/C system is engaged
Means that the acceleration enrichment mode is on
Means that the after start enrichment mode is on
Means that unknown function word 11 bit 2 is on
Means that unknown function word 11 bit 3 is on
Means that unknown function word 11 bit 7 is on
Means that unknown function word 12 bit 6 is on
Means that Idle mode is ON, generally different ignition advance and extensive usage of IACV, TPS closed or closing
Means that knock sensor detects heavy knocking now
Means that the neutral start switch is on
Means that the ECU is now in open loop mode
Means that an oxygen sensor is reading a lean air fuel ratio mixture
Means that an oxygen sensor is reading a rich air fuel ratio mixture
Means the ECU detects the starter is engaged
Means that the ECU is in self diagnosis mode. it happens when the engine start and goes away when driving if the ECU suspects nothing wrong.
Means the engine is in warm up mode

Thermal Audio Alarm

When the engine water temp exceeds 100C or 212F and audio alarm will be heard telling you there is something wrong that you should take care of, RIGHT NOW.

Known Limits of Toyota OBD1

Protocol speed is 1.3s between frames( please remember this protocol dates back to the early 90s when that speed probably seemed sufficient). Another important limitation is that no engine speed above 6375 rpm will be displayed.

Communication Heartbeat

Useful for troubleshooting, this shows when a frame is sent from the ecu to toyobd1, if the ECU sends nothing there wont be an heartbeat at all.

About author

Toyobd1/OBD1READ was carried out in the winter of 20134-2014 by JF Breton with the 3VZ-FE in mind. Canadian programmer and toyophile mainly interested in all ECU stuff,3S-GTE celicas and strange projects.

Sunday, 19 June 2016

TOYOBD1 Android Datalogger :: Jumper needed on most RWD I6 and V8 cars

Why does it need a jumper in the first place?


To output data, the ECU must be put in TEST MODE 2, this is done by jumping TE2 and E1. On most cars Toyota conveniently placed it in the engine bay diagnosis box, but decided to not place it on those cars. the OBD1READ internally jumps TE2 and E1 when connecting the tool,(the green wires on the bare unit).since the TE2 pin is missing in the diagnosis box it can't be jumped with the OBD1READ too. instead you must do it yourself at another (less but still convenient) place called the DLC2 connector. this one is in the cabin ,under the dashboard near the steering column, regardless of car being LHD or RHD. What needs to be done is place a short wire between TE2 and E1 to put the ECU in TEST MODE 2. 

Cars known to be affected by this Toyota design

  • JZA80 supra all of them
  • JZZ30 Soarers, all of them
  • JZX90 Chasers
  • JZX100 Chasers
  • Toyota Cressida (7M-GE)
  • Toyota Aristo
  • Lexus SC300 , SC400
  • Lexus LS400
  • Lexus GS300, GS400

Sunday, 17 January 2016

TOYOBD1 Android Datalogger :: Comment installer le module OBD1READ

Bonjour aujourd’hui je vais vous montrer comment installer un module OBD1READ sur une voiture compatible.


Tout d’abord regardons le contenu du paquet reçu.

  • 1x module OBD1READ .
  • 1x manuel de l'utilisateur (en anglais ) expliquant la procédure d'installation. 

Ce manuel de l'utilisateur explique quels genre de problèmes vous pourriez rencontrer pendant l'installation et comment les résoudre, ou trouver du support si rien ne fait.

Désolé, bleu est la seule couleur disponible!!


Avant de faire quoi que ce soit vous devez savoir ce qui doit être connecté a la voiture pour que ca fonctionne.

Tres facile! 4 fils ont besoins d’être connectés dans la boite diagnostique dans le compartiment moteur.

1- B+ : c'est l'alimentation 12v. il alimente le module OBD1READ quand la clef de contact est a ON.
2- E1 : c'est le ground de l'alimentation du module OBD1READ, c'est aussi le ground des signaux. 
3- TE2 : celui-ci actives la réception des données OBD1 en provenance de l'ECU.
4- VF1 : celui-ci transporte les données OBD1.


La façon la plus sure de connecter votre OBD1READ est de commencer avec B+,VF1,TE2,E1
*les fils vert peuvent être inversés entre eux ce n'est pas grave
S.V.P notez que sur certains Lexus et modèles sports, LS400, Supra mkIV, SC400 et Soarer vous aurez besoin d'un bout de fil placé dans une autre boite diagnostique placé sous le tableau de bord. Les détails d'installation pour ces voitures sont disponibles dans le glossaire de TOYOBD1 (dans l'application elle-même).


Voici les deux types de boites diagnostique que vous pouvez trouver dans le compartiment moteur.

Les contacts nécessaires devraient déjà se trouver dans la boite diagnostique sur une voiture supportée.Dans le cas d'un swap moteur avec un faisceau custom, exemple Starlet 2E -> 4E-FTE vous pourriez avoir besoin d'ajouter des fils manquants et insérer des nouveaux contact dans la boite diagnostique pour être parfaitement compatible.

 Connectez simplement les 4 fils dans la boite diagnostique et assurez vous que le module OBD1READ soit positionné en hauteur dans le compartiment moteur (c'est avantageux pour la force du signal Bluetooth). Prenez aussi le soin de bien fixer l'appareil a la voiture pour éviter qu'il ne tombe !!


A ce moment vous être prêt a démarrer votre voiture et configurer votre appareil Android et TOYOBD1.

Tuesday, 12 January 2016

Support Technique avec OBD1READ :: déterminer si l'ECU envoye des données

Il est facile de tester si votre ECU Toyota/Lexus envoie des données OBD1, il vous faut simplement un voltmètre et un bout de fil. voici comment.


-La clef de contact doit etre a ON et le moteur éteint.
-Assurez vous que vous n'avez pas un bout de fil entre E1 et TE2(pas de de continuité)

Utilisez le voltmètre pour lire encore le voltage entre VF1(borne positive) et E1( borne négative). Vous devriez voir une lecture continue d'environ 0v comme sur ce vidéo.
-Installez un bout de fil entre E1 et TE2

Utilisez le voltmètre pour lire encore le voltage entre VF1(borne positive) et E1( borne négative)cette fois vous allez voir une lecture irrégulière qui fluctue entre 0 et 5v. ça veut dire que des données sont envoyées a travers VF1.
En utilisant cette méthode vous avez pu déterminer si votre ECU envoie des données qui peuvent être lues par un module OBD1READ

OBD1READ + TOYOBD1 :: S'assurer que ca marche sur votre voiture avant l'achat!

 Il y a beaucoup de combinaisons possibles alors mettons au clair si TOYOBD1 va marcher avec la votre! Voici 5 étapes qui vous permettrons de résoudre l'énigme.


1- Est-ce que votre voiture est déjà connue pour être supportée?

Si ce n'est pas le cas je vous suggère d’abord de me contacter.


2- Vous avez besoin d'un appareil Android compatible


Les appareils Android 2.2 et plus haut avec support Bluetooth vont fonctionner.
Pour l'utilisation du mode Import/Export il est suggéré d'avoir du stockage externe.
Prenez un instant pour installer l'application TOYOBD1 et aller lire le glossaire pour vous familiariser avec les notions utilisés dans l'application.


3- Vous avez besoin de trouver 4 signaux présent a la sortie de votre ECU

Vous devez connaître exactement le branchement des connecteur de votre ECU, il peut varier pour le même moteur d'un marché a un autre, d'un modèle de voiture a une autre,d'une voiture manuelle a automatique. Si vous ne pouvez pas trouver une image du branchement de votre ECU vous pouvez aller lire les imprimés sur le circuit imprimé. S.v.p partagez vos informations!


Quand on regarde les contacts d'un ECU, nous cherchons TE2,VF ou VF1, E1 et +B. Vous avez besoin de ces 4 signaux pour que OBD1READ fonctionne, si vous n'avez pas TE2 il est impossible d'aller plus loin.


4- Vous devez connaître la boite diagnostic sur votre voiture( ou OBD1READ se connecte )

Vous devez trouver et identifier quels signaux sont disponibles dans la boite diagnostique, si vous ne trouvez pas tout vos signaux a cet endroit vous allez devoir les trouver ailleurs. L'étiquette dans le couvert de la boite diagnostique peut être mensongère, elle va vous dire ou devraient se trouver ces signaux pas elle ne vous dira pas si ils y sont vraiment.(Cette étiquette est universelle aux Toyota d'une même époque). Vous cherchez VF(1), +B,E1 et TE2 s.v.p soyez attentif plusieurs personnes ont confondus TE1 et TE2, ils sont très proches physiquement et portent des noms similaires, (si vous faites cette erreur , cela ne fera pas de dommages a votre voiture)


Vous devez aller sonder les espaces réservé a vos signaux pour savoir s'il y a ou non des contacts métaliques, Si certains sont manquants (TE2 est manquant dans quelques cas) vous devez trouver un autre endroit pour atteindre ce signal, soit au connecteur qui entre dans l'ECU sois en se branchant sur le faisceau electrique la ou c'est facile, des fois il est possible de simplement le trouver dans DLC2 sous le tableau de bord.

5- Vous avez trouvé vos signaux, maintenant il faut tester leur travail

En utilisant cette méthode vous pouvez déterminer si votre ECU peut activer un stream de données OBD1. Ça nécessite un multimètre digital a tout prix.

Résumé

A ce moment vous devriez avoir un appareil Android prêt avec TOYOBD1, vous avez un ECU qui est prouvé d'émettre des données OBD1 quand TE2 et E1 sont connectés ET vous savez ou trouver tout ces signaux.

Maintenant, On peut dire que un module OBD1READ avec TOYOBD1 va marcher sur votre voiture!

Monday, 11 January 2016

TOYOBD1 :: RÉSUMÉ

 SYSTÈME REQUIS

ECU Toyota OBD1 compatible  
Un téléphone ou tablette Android 2.2 ou plus haut avec le support du Bluetooth
un module OBD1READ installé sur votre voiture

demonstration générale(2014) désuet a la limite :)


SURVEILLANCE DES SENSEURS

  La plupart des lectures de senseurs sont accessibles

  1. Vitesse de rotation du moteur
  2. Angle d'ouverture de l'accélérateur
  3. Lecture du senseur VAF, MAF ou MA
  4. Senseur d’oxygène, soit lecture riche ou lecture pauvre
  5. Température du liquide de refroidissement
  6. Vitesse de la voiture
  7. État de l'interrupteur IDL (sur capteur d'angle de l'accélérateur)
  8. État du capteur de cliquetis
  9. État de l'interrupteur de point mort de la transmission
  10. État du démarreur

Certains champs calculés sont disponibles

  1. Consommation d'essence en MPG, KM/L, L/100KM
  2. Temps d'ouverture des injecteurs (duty cycle)

  Certaines valeurs en sortie sont disponibles

  1. Angle d'avance de feu (allumage)
  2. État de la valve de contrôle du ralenti
  3. Durée d'ouverture des injecteurs
  4. Short term fuel trims
  5. État de l'enrichissement à l'accélération
  6. État de l'enrichissement suite au démarrage
  7. État du système, boucle fermée ou boucle ouverte
  8. État du système d'auto diagnostic
  9. État de l'enrichissement au démarrage

AFFICHAGE GRAPHIQUE

AFFICHAGE TEXTUEL

AFFICHAGE EN CADRANS

ORDINATEUR DE BORD

Il y a un carnet de voyage automatique pour ceux qui désirent garder la trace de leur consommation d'essence.

ALARME THERMIQUE ( LIQUIDE DE REFROIDISSEMENT)

Une alarme thermique est incluse dans l'application. Cette dernière est configurée à 100c (valeur ajustable). Cette fonctionnalité pourrait vous épargner bien des problèmes!

LE MODE 'CARPUTER'

Vous pouvez avec TOYOBD1 configurer une tablette pour tomber en veille et revenir de veille automatiquement suivant l’état de la clef de contact.

COLLECTE DE DONNÉES

Toute les trames reçues de l'ECU sont conservées dans une base de données sur le téléphone et sont disponibles pour être extraites sous quelques formats. Très  utile pour faire une analyse pointue dans un logiciel style Excel.Vous pouvez aussi importer des données venant d'un autre téléphone pour les rejouer sur le vôtre.

FAIRE DU DIAGNOSTIC SANS ÊTRE SUR PLACE

En utilisant TOYOBD1, il est possible de détecter des senseurs en erreur ou des lectures absentes avec un data log. Avec un tel fichier, il est possible de cibler la source du problème sans jamais avoir vu la voiture en personne.

  Cas de tests simples

  1. Opération de l'interrupteur IDL
  2. Opération du capteur de position du papillon de gaz
  3. Opération du capteur de pression d'air
  4. Opération du senseur de température du liquide de refroidissement
  5. Détecter la surchauffe du moteur
  6. Opération de la sonde à oxygène
  7. Opération du senseur de vitesse de la voiture
  8. Un interrupteur STA collé.
  9. Un code d'erreur en gestation mais pas encore affiché par l'ECU

Cas de tests avancés

  1. Reconnaitre une mauvaise lecture du capteur de pression d'air
  2. Détecter un mauvais thermostat en analysant les lectures de température de liquide de refroidissement
  3. Estimer la performance du moteur avec une lecture de débit mètre
  4. Déterminer des problèmes d'alimentation de carburant à travers l'analyse de la sonde à oxygène, la durée d'ouverture des injecteurs et le short term fuel trim
  5. Utiliser TOYOBD1 pour avoir du feedback lors de tuning de débit mètre (VAF)

COLLECTE D'INFORMATION PRÉALABLE À UN PROJET D'ORDINATEUR PROGRAMMABLE (STAND ALONE)

Avec cette application, il est possible d'extrapoler des données pour faire la calibration d'un ordinateur programmable (stand alone).

  1. Avance de feu lorsque le démarreur est actif
  2. Le point ou se termine le mode de réchauffement du moteur (ceci varie beaucoup entre les moteurs Toyota. Certains arrêtent très tôt, certains très tard.)
  3. Avance de feu quand le moteur est chaud au ralenti
  4. Carte d'essence (vous devez prendre la peine d'obtenir une lecture dans toutes les cellules RPMx charge pour avoir une carte précise) Ça peut être fastidieux.
  5. Carte d'allumage
  6. La stratégie de contrôle de la valve du contrôle du ralenti.
  7. Quand le mode en boucle fermée change pour le mode en boucle ouverte

Sunday, 10 January 2016

TOYOBD1 Android datalogger :: Moteurs supporté

Voici une liste de compatibilité des moteurs supportés par TOYOBD1 en utilisant un module OBD1READ


Les moteurs au pétrole prouvés déjà

  • USDM 3VZ-FE 
  • JDM 1992+ 4E-FTE EP82
  • JDM 4A-GE AE111(blacktop)
  • JDM 2JZ-GTE JZA80
  • USDM 1994 2JZ-GE JZA80
  • USDM 2JZ-GTE JZA80
  • JDM 1JZ-GTE JZZ30,JZX90
  • JDM 1JZ-GTE VVT-i JX100 1998 et moins SEULEMENT
  • JDM 1992-1993 3S-GTE
  • USDM 1992-1993 Celica 5S-FE 
  • 1994-1995 Celica 5S-FE 
  • USDM 1UZ-FE SC400 et LS400
  • JDM 3S-GTE ST205 WRC
  • USDM 4A-FE 1993
  • 1991+ 3VZ-E Pickup et 4Runner
  • USDM 22R-E 94-95 
  • JDM 4A-GE AE101(silvertop)
  • 1992-1993 REV2 3S-GE (SW20) 89661-17370
  • ST202 3S-GE
  • SW20 1992+ 3S-GTE
  • EE101 4E-FE
  • EP91 4E-FE
  • EP91 4E-FTE
  • USDM 7A-FE 1993 
  • JZA70 1JZ-GTE 
  • JDM 2TZ-FE 1994 et plus récent
  • JDM 5E-FHE EL54 (2e génération) 
  • Land Cruiser 1FZ-FE(plus de détails nécessaires pour les années supportées )
  • 88-92 Cressida A/T 7M-GE
  • 88-91 2VZ-FE 89661-32590 ES250 et les Camry V6 2.5L
  • les derniers 2TZ-FE (avec un map sensor )
  •  5E-FE Generation 2 ,PASEO UK

Les moteurs diesel déja prouvés

  •  2C-E sur Corolla européen
  • 1995 1KZ-TE Diesel Land Cruiser (Afrique)   
  • Toyota Estima 3C-TE ( toyota estima )

Les moteurs qui sont des candidats encore à prouver

  • Tous les moteurs JDM après 1992 qui ont des pins TE2 ,E1,B+ et VF(1)dans leur boite diagnostic devraient fonctionner.
  • Certains moteurs non JDM entre 1992 et avant OBDII
  • AE101 4A-GZE
  • 2RZ-FE selon le pays
  • Avenis turbo diesel 2C-TE 
  • les premiers 2JZ-GE VVti sur JZX100
  • 2L-TE et 2L-THE sur Crown
  • les derniers1G-GE sur Crown GS13X
  • 1G-GZE
  • les derniers 1G-GTE (mark 2, cresta, chaser)

Les moteurs clairement non supportés

  • Tout moteur Toyota avant 1988
  • La majorité des moteurs simples Toyota avant 1992 (3E-E,2E-E,3S-FE,3S-GE,4A-FE,4A-GE)
  • tous les moteurs OBDII (SVP LISEZ LA LISTE DES MOTEURS JDM OBDII PLUS BAS)
  • 1MZ-FE
  • 5VZ-FE
  • tous les 4A-GE 16V 
  • 3E-E et 2E-E toutes années confondues
  • les moteurs Diesel sans ordinateur
  • 5E-FE de 1re génération
  •  5E-FHE de 1re génération
  • 90-91 4E-FTE 
  • 90-91 3S-FE 
  • 90-91 3S-GE
  • 90-91 5S-FE
  • 90-91 3S-GTE
  • AW11 4A-GZE
  • 7M-GE de Supra
  • LN130 2L-TE
  • les plus anciens 1G-GTE (GA70,GZ20)
  • 7M-GTE (http://i88.photobucket.com/albums/k162/crzywhtrican576/supradiag89.jpg) 
  • 1990-1993 2TZ-FE
  • 2TZ-FZE(OBDII)
  • 1UZ-FE VVTI 

VOICI UNE LISTE DES MOTEURS JDM OBDII QUI NE PEUVENT PAS MARCHER AVEC TOYOBD1


Pour trouver une indication que votre moteur est OBDII, cherchez la pin SIL sur le schéma électrique de l'ECU

*pour ceux qui cherchent désespérément à obtenir des lectures avec des moteurs obd2, avec un elm327 très récent il semble être possible après une configuration dans l'application Android Torque d'avoir des résultats.


Saturday, 24 October 2015

OBD1READ module :: NEW ORDERING OPTIONS


  New ordering options are available!

!! AS OF 2015/05/23 PLEASE NOTE THE STANDARD VERSION IS DISCONTINUED !!

You can now order your OBD1READ device with 3 wire ends type. the Standard version with the probes and shrink wrap sleeves, the Bare version with nothing but bare wire ends and the 22pin version.

Standard OBD1READ and Bare OBD1READ shown together

  All variants have their intended uses.  

Standard version pricing follows the existing Price Table.

The standard version is meant for all use cases and all supported engine/cars variants, supporting all diagnosis box types while still retaining an affordable price.

Bare version comes with a price reduction of 1,50$ USD over Standard pricing

The Bare version is meant for use in hard wired installs (directly tapping into the engine harness near the ECU.It can  happen if you want the best Bluetooth signal strength from inside your car,or you have a custom engine swap that do not respect anymore the wiring diagram )

22 Pin plug & play version adds 5$ USD over Standard pricing

Pricier, the 22 pin version can connect directly into both 17 pins and 22 pins diagnosis boxes, this alleviates any connection errors or loose connection problems. Easiest and fastest to setup for temporary use on various cars and most robust connection for a permanent plug & play install.
22 pin connector variant, you can't mess up wire connection with this one!